Industrial CT vs. traditional inspection techniques

Edited by
Date
October 23, 2023

As industries evolve, the tools they rely on for quality control and inspection have to keep up. In this constantly shifting landscape, industrial X-ray CT scanning emerges as a game-changer. While traditional inspection techniques have their merits, industrial CT brings a level of precision and insight that is simply unmatched. Let's delve into the world of legacy inspection methods and explore how industrial CT sets a new standard by offering non-destructive, high-resolution, and comprehensive inspection capabilities that can save engineers months of time and millions of dollars.

Traditional inspection techniques

Visual inspection

Visual inspection is a foundational quality control method used across industries, including manufacturing, aerospace, and electronics. It involves a manual examination of components, relying on the human eye to detect surface defects, irregularities, or visual anomalies. While it is a cost-effective initial inspection step, visual inspection has inherent limitations. It is highly dependent on the operator's visual acuity and can be affected by fatigue, environmental conditions, and subjective factors. Additionally, it is primarily a surface-level inspection and cannot reveal internal defects or provide precise measurements.

Industrial CT overcomes the limitations of visual inspection by offering comprehensive, non-destructive 3D scanning capabilities. Instead of relying solely on surface appearance, CT scans capture both external and internal details. This technology is particularly valuable in industries where intricate internal structures and hidden defects can compromise product quality and safety. By providing a more detailed and accurate assessment, industrial CT enhances quality control and minimizes the risk of missed defects, making it a superior alternative to traditional visual inspection. Plus, CT data can be combined with automated analysis software, which can catch defects and out-of-spec parts faster and more reliably than human inspectors.
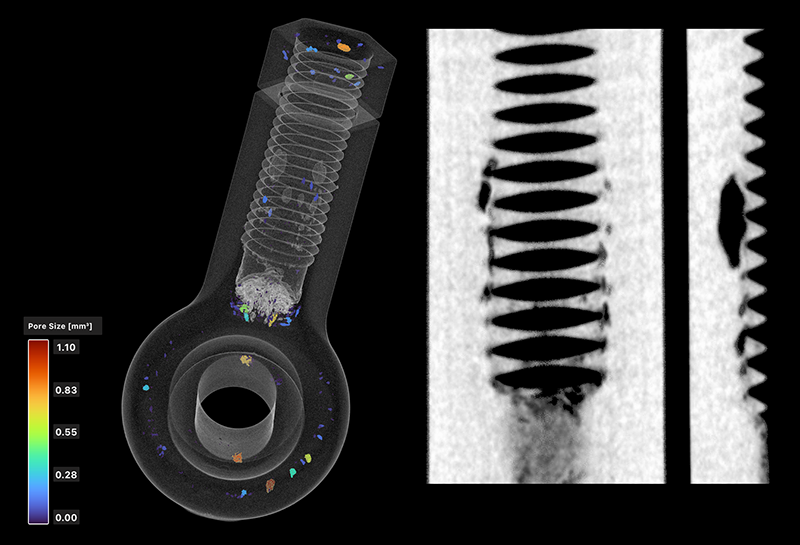
There's considerable internal porosity inside this fiber-filled resin rod bearing. The voids around the threading  could contribute to tear out under high axial loads. These internal defects are invisible to most traditional inspection techniques.
Coordinate Measuring Machines (CMMs)

Coordinate Measuring Machines (CMMs) are precision measurement tools widely used in the automotive, aerospace, and medical device industries. CMMs capture dimensional data by probing various points on an object's surface, allowing for the creation of detailed 3D models and comparisons with CAD designs. While CMMs are valuable for their accuracy in measuring external dimensions, they have limitations when it comes to inspecting complex internal structures or hidden defects.

CMMs are primarily focused on external measurements and may struggle with assessing complex geometries, overhangs, or components with intricate internal features. Their operation is often time-consuming, requiring precise alignment and multiple measurements to ensure accuracy. In contrast, industrial CT offers a holistic approach to dimensional inspection. It not only captures external dimensions with high precision but also visualizes the internal structures of parts. This capability is crucial in industries where internal defects can compromise safety or functionality.
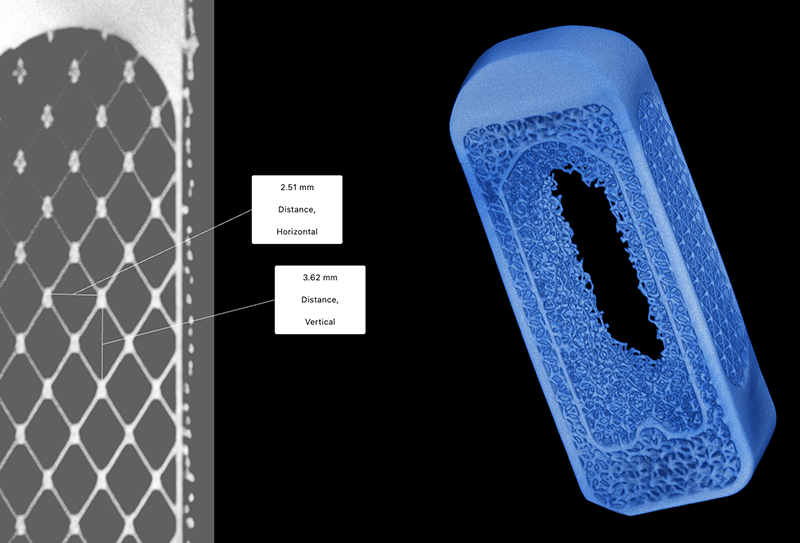
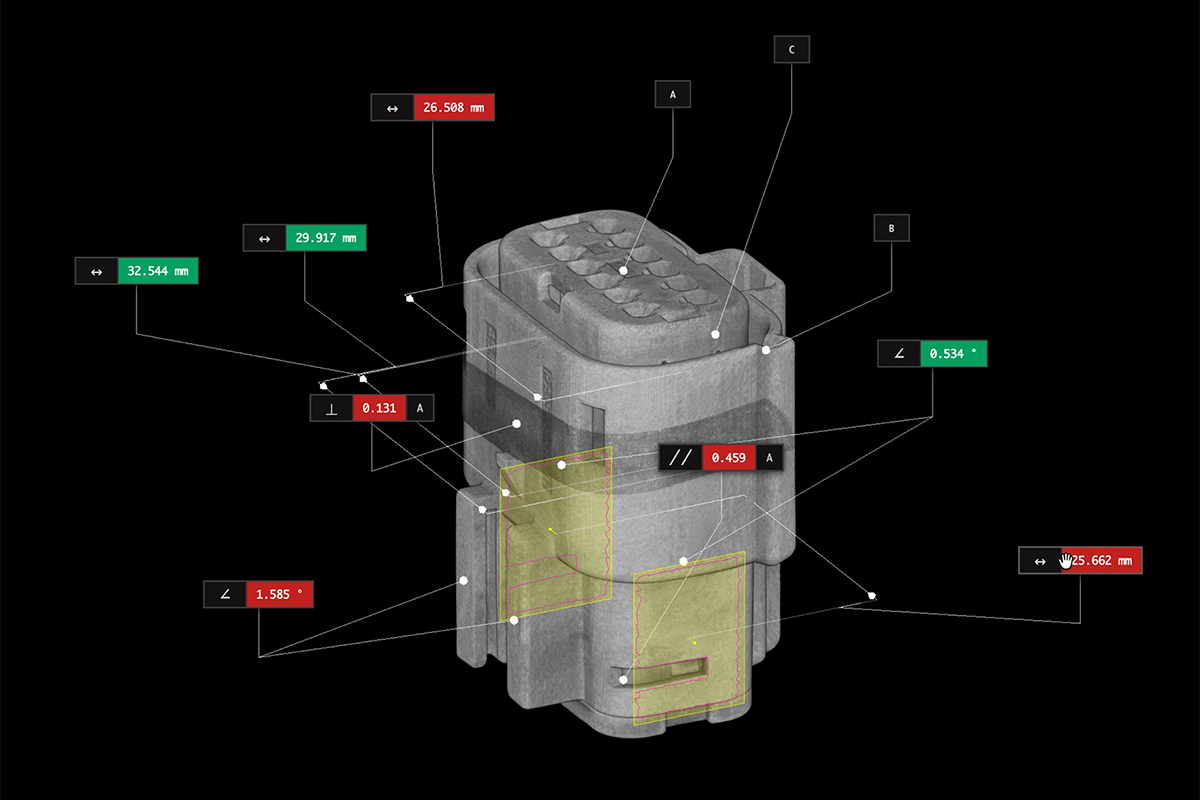
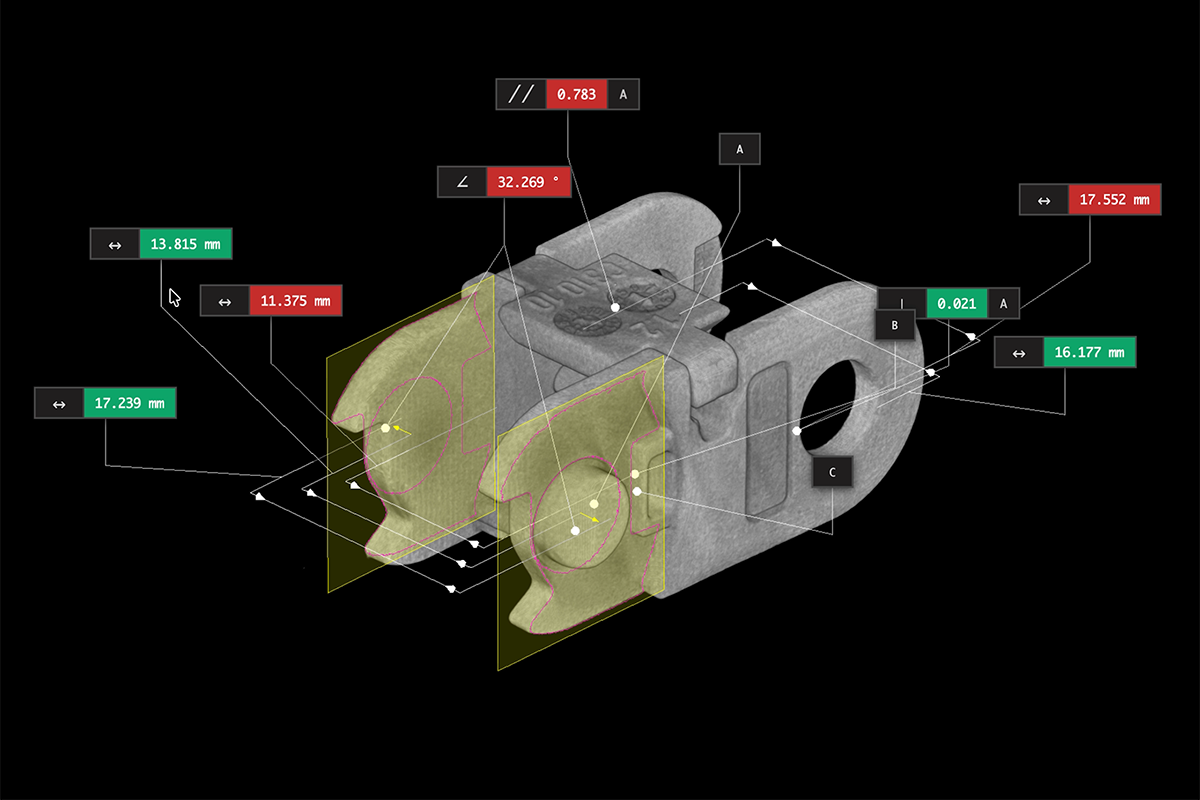
Industrial CT allows for precise internal measurements, as shown here in the dimensions of the interior lattice structure of a spinal implant.
2D X-ray inspection

X-ray inspection is a widely utilized technique for assessing the internal structures and integrity of various materials and components. Industries such as electronics manufacturing, aerospace, and automotive rely on X-ray inspection to identify defects like voids, cracks, and soldering issues within objects. X-ray imaging is effective for non-destructive testing; however, it has limitations, especially when inspecting complex and multi-material components.

X-ray inspection relies on 2D radiographic images, making it challenging to visualize intricate 3D structures comprehensively. It can struggle with differentiating materials with similar X-ray attenuation properties, leading to potential false identifications. Additionally, X-ray inspection may not provide the level of detail needed to pinpoint subtle defects or assess the entirety of complex assemblies. X-ray radiography is the basis of industrial CT scanning, but CT offers higher-resolution images and can generate three-dimensional reconstructions, enabling detailed inspections of complex structures. CT also offers enhanced material differentiation, making it ideal for assessing multi-material components.

Dye penetrant inspection (DPI)

Dye penetrant inspection (DPI), also known as liquid penetrant inspection (LPI), is a widely employed inspection method across industries such as aerospace, automotive, and manufacturing. Its primary purpose is to identify surface defects and irregularities in materials. This technique involves applying a colored penetrant liquid to the surface of the material, allowing it to seep into any surface-breaking defects through capillary action. After a specific dwell time, excess penetrant is removed, and a developer is applied, causing the penetrant trapped in defects to bleed out, making them visible.

However, dye penetrant testing has notable limitations. It is a surface-specific technique, unable to detect internal or subsurface defects. It also cannot assess complex geometries or components with intricate structures. Industrial CT emerges as a superior alternative by offering non-destructive 3D scanning capabilities. While dye penetrant testing is limited to surface defects, industrial CT can unveil both external and internal defects, providing a comprehensive assessment. 
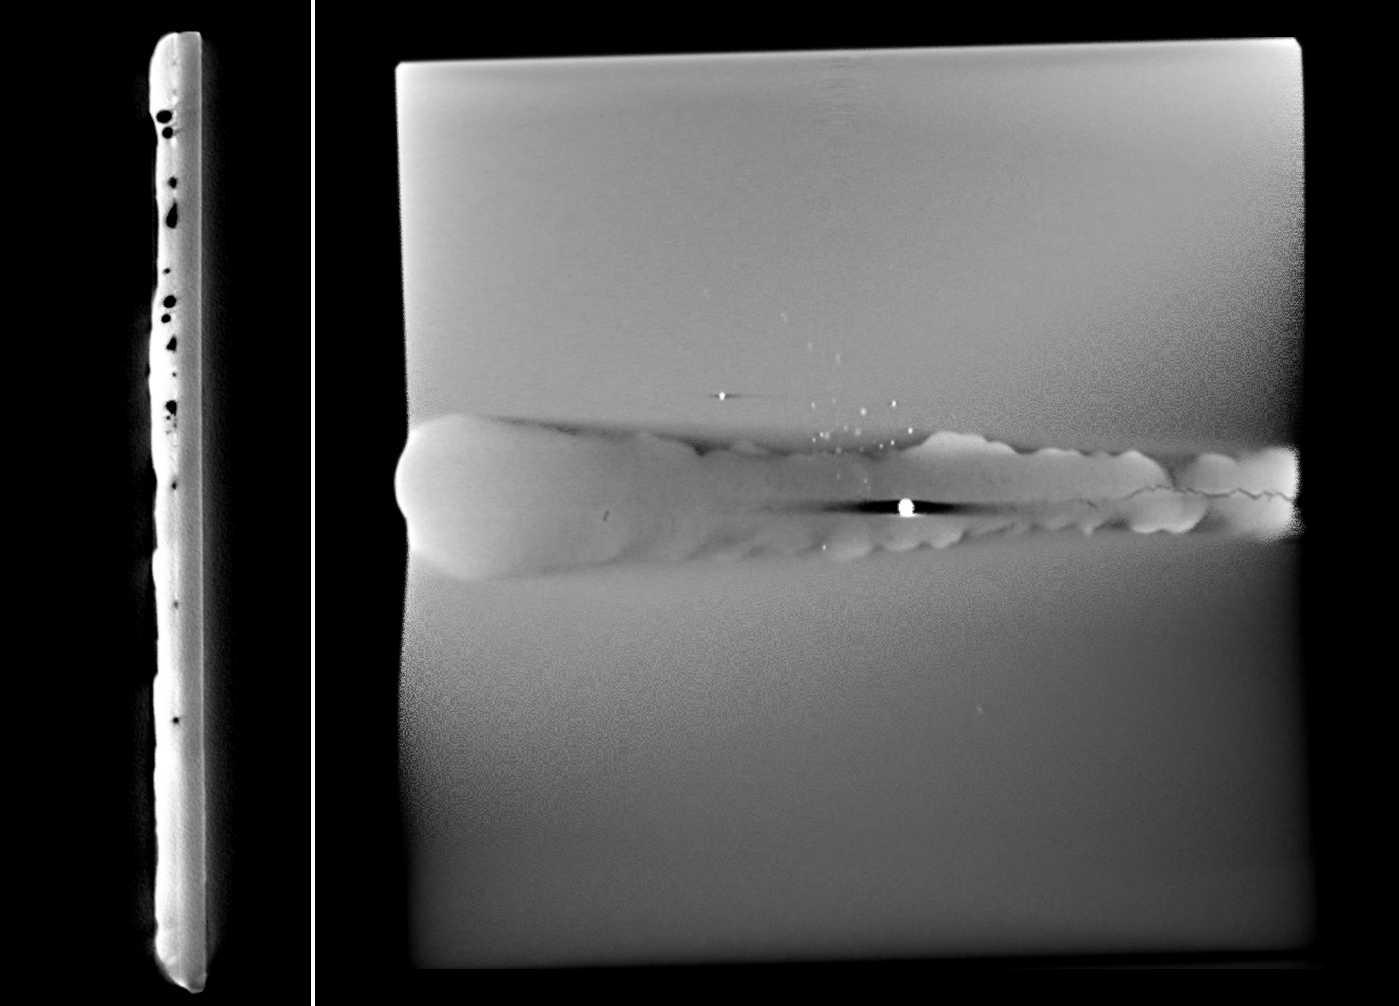
Dye penetrant inspection (DPI) is often used to assess weld quality. However, the internal qualities of welds such as porosity (left) and inclusions (right) would escape this inspection technique. Industrial CT catches these flaws easily.
Ultrasonic testing

Ultrasonic testing is commonly utilized in industries like aerospace, wind energy, and automotive for inspecting composite materials. Composites are prized for their lightweight and durable characteristics, but they can also have hidden defects like delaminations, voids, or porosity. Ultrasonic testing uses high-frequency sound waves to detect these flaws by sending pulses through the material and analyzing the reflected waves.

Ultrasonic testing has certain limitations, particularly when it comes to complex composite structures. It can struggle to accurately identify defects in curved or irregularly shaped components. Additionally, it is highly dependent on the operator's skill and the material's acoustic properties, which can lead to variances in inspection accuracy. Industrial CT provides a robust solution to these challenges. With its ability to generate 3D images and perform volumetric inspections, industrial CT offers a comprehensive view of composite materials, surpassing the limitations of traditional ultrasonic testing.

Eddy current testing

Eddy current testing is a widely employed non-destructive testing technique used in industries such as aerospace, automotive, and medical device manufacturing. It relies on the principle of electromagnetic induction to detect surface and subsurface defects in conductive materials. Eddy current testing is particularly effective for identifying cracks, corrosion, and material inconsistencies near the surface of components. However, it has certain shortcomings that industrial CT can address.

Eddy current testing is primarily sensitive to surface and near-surface defects, making it less effective at inspecting complex internal structures or defects deep within an object. Additionally, it may require close contact or proximity to the material being tested, limiting its application in certain scenarios. Industrial CT, on the other hand, offers a more comprehensive approach to defect detection. By providing detailed 3D scans of both external and internal features, CT can identify defects that may not be visible with eddy current testing alone.

Eddy current testing and magnetic particle inspection (MPI) could be used to assess the exterior of this life-saving pacemaker. Industrial CT, however, is the only way to thoroughly inspect this medical device's internal features, including its complex circuit board and specialized lithium-iodine battery.
Thickness gauges

Thickness gauges are commonly used in industries such as manufacturing and construction to measure the thickness of materials, primarily metals. They play a crucial role in ensuring materials meet specified thickness standards, which is vital for structural integrity and safety. Familiar physical gauges such as calipers have been used for centuries, but newer digital thickness gauges work by transmitting a signal, typically an electromagnetic wave or ultrasonic pulse, through the material and measuring the time it takes for the signal to bounce back.

Despite their utility, digital thickness gauges have limitations, especially when assessing non-metallic materials or complex structures. They may not provide accurate measurements for materials with irregular surfaces or those that are not perfectly smooth. They are also limited to single-point measurements and cannot provide insights into the overall thickness profile or detect internal defects. In contrast, industrial CT offers a versatile solution for thickness measurements by taking dimensions of complex features that aren't accessible to calipers or gauges. With its ability to create 3D models of objects, CT can precisely measure variations in thickness and identify internal defects across complex geometries and materials.

Magnetic particle inspection (MPI)

Magnetic particle inspection (MPI) is a widely used non-destructive testing method in industries like automotive, oil and gas, and structural engineering. It is primarily employed to detect surface and near-surface defects in ferrous materials. MPI relies on the application of a magnetic field and the use of magnetic particles that accumulate at defect locations, making defects visible under proper lighting conditions. While MPI is effective for detecting surface cracks and flaws, it cannot comprehensively assess internal structures and complex components.

MPI's effectiveness is limited to ferrous materials and surface-level defects. It may not adequately detect defects that are deeper within a component or made of non-ferrous materials. Furthermore, MPI is often a contact-based inspection method, which can be time-consuming and labor-intensive. Industrial CT offers a non-contact, non-destructive inspection technique that provides comprehensive 3D scans of objects, including their internal structures. CT can identify internal defects, even in non-ferrous materials, and is not limited to surface-level inspections. 

Industrial X-ray CT

Industrial CT stands as a transformative force in the realm of quality assurance, profoundly impacting the product development lifecycle with its clear advantages over traditional inspection techniques. Unlike these methods, CT provides a comprehensive and non-destructive examination of both external and internal components. This unique capability enables manufacturers to detect defects at early stages, preventing costly recalls and minimizing scrap rates.

The practical implications of industrial CT's prowess are far-reaching. It equips manufacturers with a powerful tool to ensure product quality, enhance safety, and drive innovation. With CT, companies can save significant time and resources, streamline their operations, and maintain a competitive edge in an ever-evolving market landscape. Industrial CT is not merely a refinement of existing methods; it represents a paradigm shift in how we approach product development, setting a new standard for precision and efficiency.

Resource
Article

Industrial CT vs. traditional inspection techniques

October 23, 2023

Industrial CT vs. traditional inspection techniques

As industries evolve, the tools they rely on for quality control and inspection have to keep up. In this constantly shifting landscape, industrial X-ray CT scanning emerges as a game-changer. While traditional inspection techniques have their merits, industrial CT brings a level of precision and insight that is simply unmatched. Let's delve into the world of legacy inspection methods and explore how industrial CT sets a new standard by offering non-destructive, high-resolution, and comprehensive inspection capabilities that can save engineers months of time and millions of dollars.

Traditional inspection techniques

Visual inspection

Visual inspection is a foundational quality control method used across industries, including manufacturing, aerospace, and electronics. It involves a manual examination of components, relying on the human eye to detect surface defects, irregularities, or visual anomalies. While it is a cost-effective initial inspection step, visual inspection has inherent limitations. It is highly dependent on the operator's visual acuity and can be affected by fatigue, environmental conditions, and subjective factors. Additionally, it is primarily a surface-level inspection and cannot reveal internal defects or provide precise measurements.

Industrial CT overcomes the limitations of visual inspection by offering comprehensive, non-destructive 3D scanning capabilities. Instead of relying solely on surface appearance, CT scans capture both external and internal details. This technology is particularly valuable in industries where intricate internal structures and hidden defects can compromise product quality and safety. By providing a more detailed and accurate assessment, industrial CT enhances quality control and minimizes the risk of missed defects, making it a superior alternative to traditional visual inspection. Plus, CT data can be combined with automated analysis software, which can catch defects and out-of-spec parts faster and more reliably than human inspectors.

There's considerable internal porosity inside this fiber-filled resin rod bearing. The voids around the threading  could contribute to tear out under high axial loads. These internal defects are invisible to most traditional inspection techniques.
Coordinate Measuring Machines (CMMs)

Coordinate Measuring Machines (CMMs) are precision measurement tools widely used in the automotive, aerospace, and medical device industries. CMMs capture dimensional data by probing various points on an object's surface, allowing for the creation of detailed 3D models and comparisons with CAD designs. While CMMs are valuable for their accuracy in measuring external dimensions, they have limitations when it comes to inspecting complex internal structures or hidden defects.

CMMs are primarily focused on external measurements and may struggle with assessing complex geometries, overhangs, or components with intricate internal features. Their operation is often time-consuming, requiring precise alignment and multiple measurements to ensure accuracy. In contrast, industrial CT offers a holistic approach to dimensional inspection. It not only captures external dimensions with high precision but also visualizes the internal structures of parts. This capability is crucial in industries where internal defects can compromise safety or functionality.

Industrial CT allows for precise internal measurements, as shown here in the dimensions of the interior lattice structure of a spinal implant.
2D X-ray inspection

X-ray inspection is a widely utilized technique for assessing the internal structures and integrity of various materials and components. Industries such as electronics manufacturing, aerospace, and automotive rely on X-ray inspection to identify defects like voids, cracks, and soldering issues within objects. X-ray imaging is effective for non-destructive testing; however, it has limitations, especially when inspecting complex and multi-material components.

X-ray inspection relies on 2D radiographic images, making it challenging to visualize intricate 3D structures comprehensively. It can struggle with differentiating materials with similar X-ray attenuation properties, leading to potential false identifications. Additionally, X-ray inspection may not provide the level of detail needed to pinpoint subtle defects or assess the entirety of complex assemblies. X-ray radiography is the basis of industrial CT scanning, but CT offers higher-resolution images and can generate three-dimensional reconstructions, enabling detailed inspections of complex structures. CT also offers enhanced material differentiation, making it ideal for assessing multi-material components.

Dye penetrant inspection (DPI)

Dye penetrant inspection (DPI), also known as liquid penetrant inspection (LPI), is a widely employed inspection method across industries such as aerospace, automotive, and manufacturing. Its primary purpose is to identify surface defects and irregularities in materials. This technique involves applying a colored penetrant liquid to the surface of the material, allowing it to seep into any surface-breaking defects through capillary action. After a specific dwell time, excess penetrant is removed, and a developer is applied, causing the penetrant trapped in defects to bleed out, making them visible.

However, dye penetrant testing has notable limitations. It is a surface-specific technique, unable to detect internal or subsurface defects. It also cannot assess complex geometries or components with intricate structures. Industrial CT emerges as a superior alternative by offering non-destructive 3D scanning capabilities. While dye penetrant testing is limited to surface defects, industrial CT can unveil both external and internal defects, providing a comprehensive assessment. 

Dye penetrant inspection (DPI) is often used to assess weld quality. However, the internal qualities of welds such as porosity (left) and inclusions (right) would escape this inspection technique. Industrial CT catches these flaws easily.
Ultrasonic testing

Ultrasonic testing is commonly utilized in industries like aerospace, wind energy, and automotive for inspecting composite materials. Composites are prized for their lightweight and durable characteristics, but they can also have hidden defects like delaminations, voids, or porosity. Ultrasonic testing uses high-frequency sound waves to detect these flaws by sending pulses through the material and analyzing the reflected waves.

Ultrasonic testing has certain limitations, particularly when it comes to complex composite structures. It can struggle to accurately identify defects in curved or irregularly shaped components. Additionally, it is highly dependent on the operator's skill and the material's acoustic properties, which can lead to variances in inspection accuracy. Industrial CT provides a robust solution to these challenges. With its ability to generate 3D images and perform volumetric inspections, industrial CT offers a comprehensive view of composite materials, surpassing the limitations of traditional ultrasonic testing.

Eddy current testing

Eddy current testing is a widely employed non-destructive testing technique used in industries such as aerospace, automotive, and medical device manufacturing. It relies on the principle of electromagnetic induction to detect surface and subsurface defects in conductive materials. Eddy current testing is particularly effective for identifying cracks, corrosion, and material inconsistencies near the surface of components. However, it has certain shortcomings that industrial CT can address.

Eddy current testing is primarily sensitive to surface and near-surface defects, making it less effective at inspecting complex internal structures or defects deep within an object. Additionally, it may require close contact or proximity to the material being tested, limiting its application in certain scenarios. Industrial CT, on the other hand, offers a more comprehensive approach to defect detection. By providing detailed 3D scans of both external and internal features, CT can identify defects that may not be visible with eddy current testing alone.

Eddy current testing and magnetic particle inspection (MPI) could be used to assess the exterior of this life-saving pacemaker. Industrial CT, however, is the only way to thoroughly inspect this medical device's internal features, including its complex circuit board and specialized lithium-iodine battery.
Thickness gauges

Thickness gauges are commonly used in industries such as manufacturing and construction to measure the thickness of materials, primarily metals. They play a crucial role in ensuring materials meet specified thickness standards, which is vital for structural integrity and safety. Familiar physical gauges such as calipers have been used for centuries, but newer digital thickness gauges work by transmitting a signal, typically an electromagnetic wave or ultrasonic pulse, through the material and measuring the time it takes for the signal to bounce back.

Despite their utility, digital thickness gauges have limitations, especially when assessing non-metallic materials or complex structures. They may not provide accurate measurements for materials with irregular surfaces or those that are not perfectly smooth. They are also limited to single-point measurements and cannot provide insights into the overall thickness profile or detect internal defects. In contrast, industrial CT offers a versatile solution for thickness measurements by taking dimensions of complex features that aren't accessible to calipers or gauges. With its ability to create 3D models of objects, CT can precisely measure variations in thickness and identify internal defects across complex geometries and materials.

Magnetic particle inspection (MPI)

Magnetic particle inspection (MPI) is a widely used non-destructive testing method in industries like automotive, oil and gas, and structural engineering. It is primarily employed to detect surface and near-surface defects in ferrous materials. MPI relies on the application of a magnetic field and the use of magnetic particles that accumulate at defect locations, making defects visible under proper lighting conditions. While MPI is effective for detecting surface cracks and flaws, it cannot comprehensively assess internal structures and complex components.

MPI's effectiveness is limited to ferrous materials and surface-level defects. It may not adequately detect defects that are deeper within a component or made of non-ferrous materials. Furthermore, MPI is often a contact-based inspection method, which can be time-consuming and labor-intensive. Industrial CT offers a non-contact, non-destructive inspection technique that provides comprehensive 3D scans of objects, including their internal structures. CT can identify internal defects, even in non-ferrous materials, and is not limited to surface-level inspections. 

Industrial X-ray CT

Industrial CT stands as a transformative force in the realm of quality assurance, profoundly impacting the product development lifecycle with its clear advantages over traditional inspection techniques. Unlike these methods, CT provides a comprehensive and non-destructive examination of both external and internal components. This unique capability enables manufacturers to detect defects at early stages, preventing costly recalls and minimizing scrap rates.

The practical implications of industrial CT's prowess are far-reaching. It equips manufacturers with a powerful tool to ensure product quality, enhance safety, and drive innovation. With CT, companies can save significant time and resources, streamline their operations, and maintain a competitive edge in an ever-evolving market landscape. Industrial CT is not merely a refinement of existing methods; it represents a paradigm shift in how we approach product development, setting a new standard for precision and efficiency.

Skip to main content