Ready to explore CT scans?

Create a free Lumafield Voyager account to start exploring real CT data in your browser today.

Try the Demo

What is industrial CT?

Edited by
Date
October 30, 2023

Industrial X-ray CT (Computed Tomography) is transforming the landscape of product development, providing engineers with a powerful tool to unlock new insights, streamline processes, and drive innovation. Companies who insist on the highest standards of quality and efficiency are using industrial CT to accelerate decision-making and time-to-market while also saving millions of dollars on destructive testing, prototyping, and potential recalls. But what exactly is Industrial CT, and how does it empower engineers and manufacturers? 

How did CT start?

The roots of industrial Computed Tomography (CT) trace back to the pioneering work of Godfrey Hounsfield and Allan MacLeod Cormack in the realm of medical imaging, a monumental achievement that earned them the Nobel Prize in Medicine in 1979. Their work aimed to enable non-invasive imaging of the human body's internal structures. Over time, this medical breakthrough gradually found its way into industrial applications, evolving into industrial CT.

The transformation from medical CT to industrial CT marked a significant turning point for inspection at all stages of the product development process. By adapting the principles of medical CT, industrial CT has become a vital tool in manufacturing, engineering, and quality control. This evolution has enabled non-destructive inspection and analysis processes, shaping the way industries inspect components, assemblies, and materials. Industrial CT stands as a testament to the power of innovation: originally conceived to improve healthcare, it now advances a multitude of industries by providing unparalleled insights through high-resolution, non-destructive 3D imaging.

How does industrial CT work?

Industrial CT scanners take hundreds of X-ray images from different angles to capture the internal and external structure of objects in three dimensions. These scanners, including the Lumafield Neptune, work on the same basic principle as medical CT, but in a different form factor. Medical CT scanners rotate an X-ray source and a detector around a human patient. Industrial CT scanners use a turntable to rotate an object between a stationary X-ray source and detector. As X-ray beams penetrate the object, they are attenuated at varying degrees depending on the density and composition of the material they traverse. The detector records these variances, generating what are known as X-ray projections or radiographs.
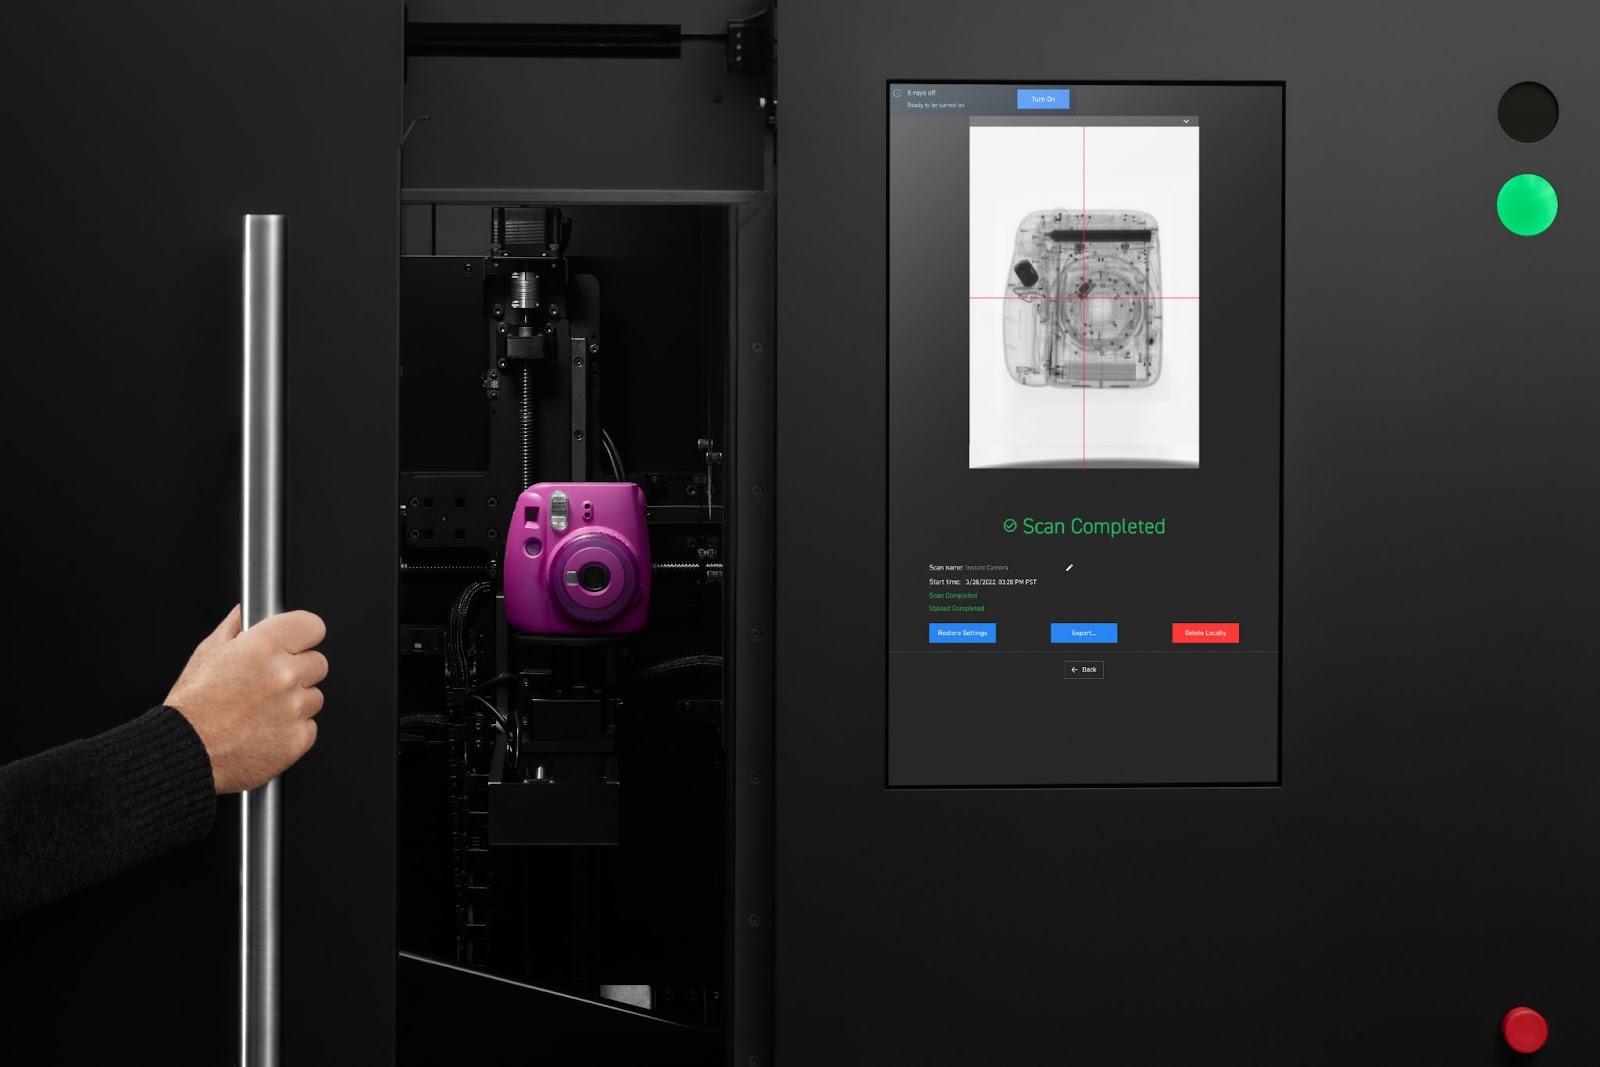
In the Lumafield Neptune industrial X-ray CT scanner, an object rotates on a turntable while a stationary X-ray source takes a series of 2D radiographs of the object.

The fundamental workings of industrial CT are akin to solving a Sudoku puzzle. In Sudoku, you can deduce missing numbers by understanding that each row, column, and box must add up to a specific total. Similarly, industrial CT relies on collecting a series of 2D X-ray images, known as "radiographs," from 360 degrees around an object. Each radiograph represents an X-ray "shadow," providing information about what the X-ray encountered as it passed through the object en route to the detector. Through a process called reconstruction, these X-ray shadows are meticulously analyzed and integrated, much like solving a Sudoku puzzle.

During reconstruction, a sophisticated algorithm assembles these shadows to determine the materials' distribution within the scanned object in three-dimensional space. The result is a comprehensive 3D image in which each 3D pixel, known as a "voxel," holds a value representing the material's density at that precise location within the object. This non-destructive approach allows engineers and manufacturers to explore an object's internal and external structures with remarkable precision, without altering the physical integrity of the item.
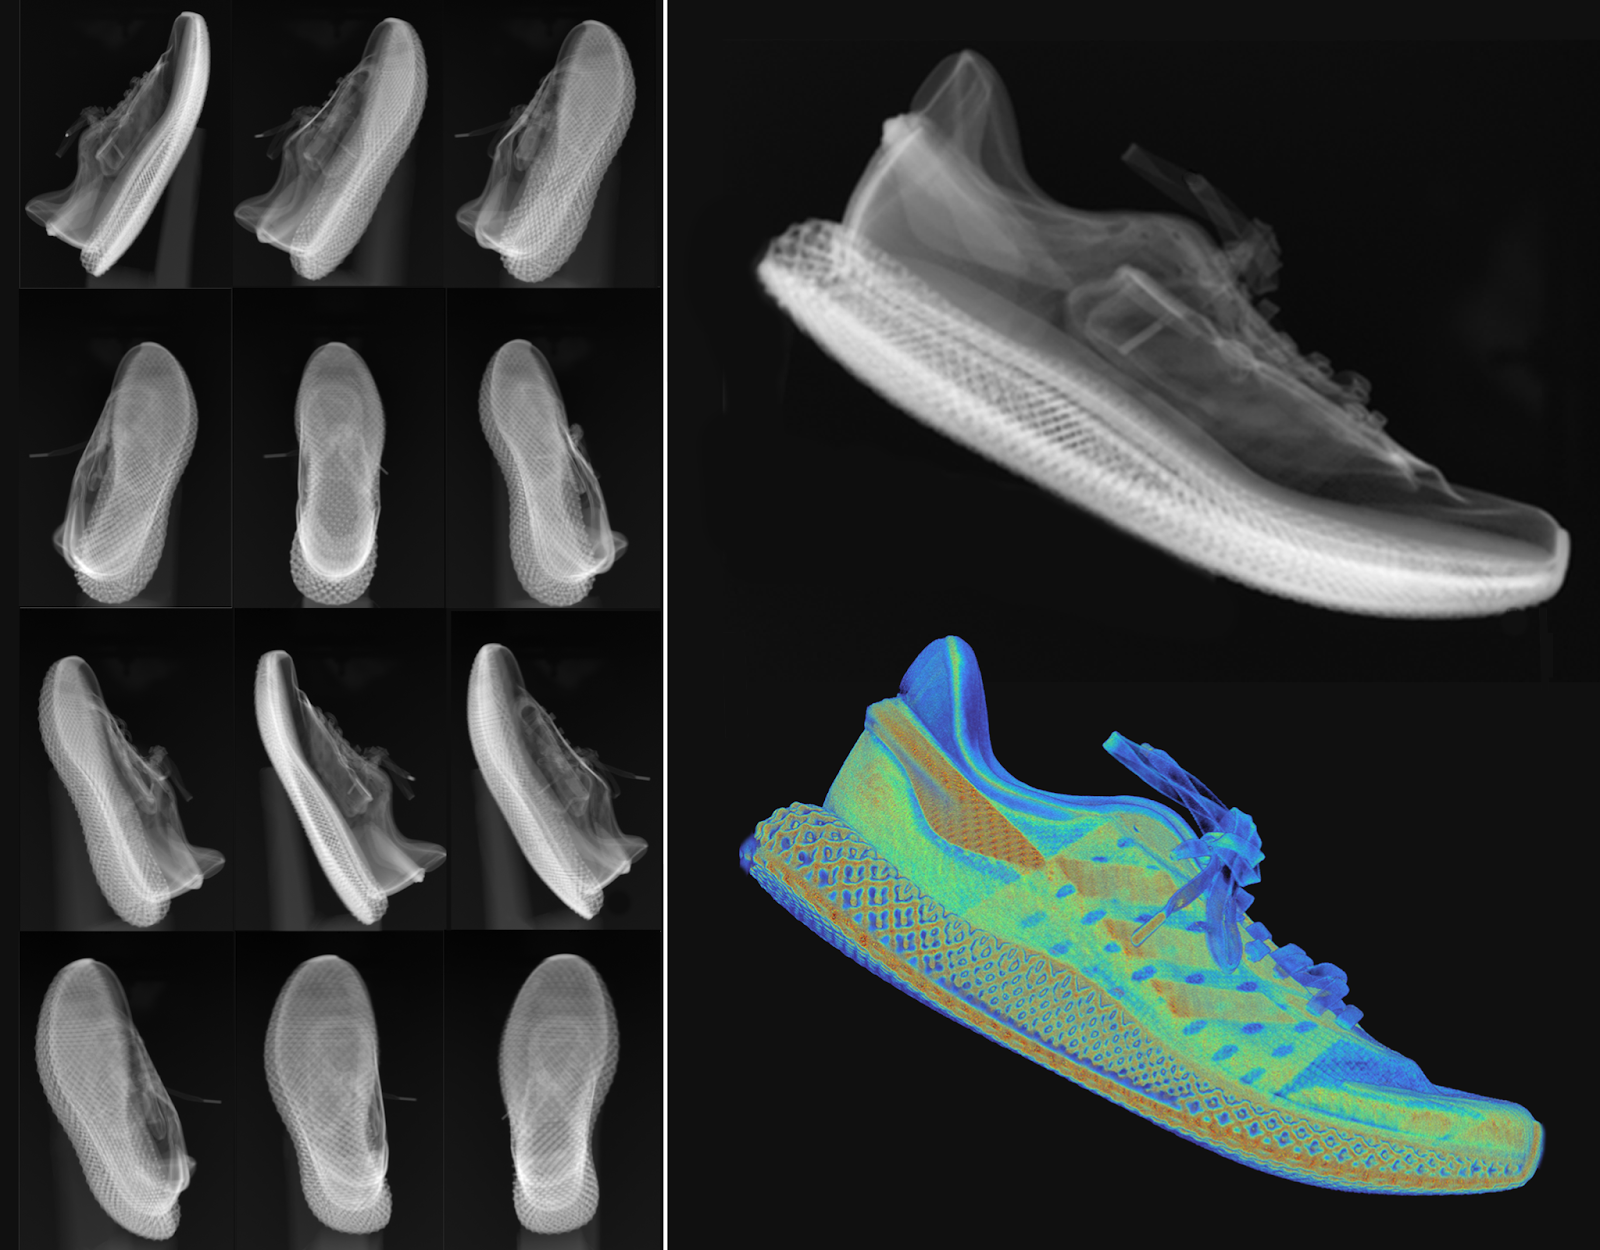
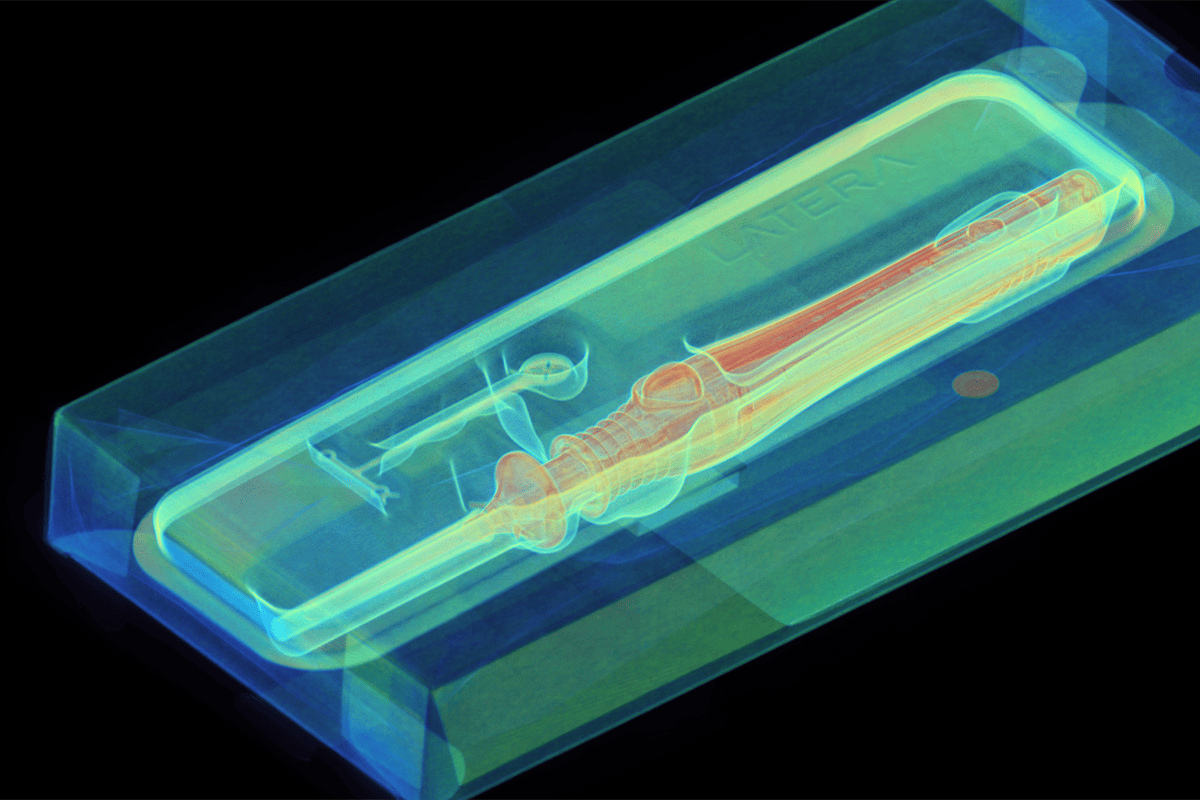
Complex algorithms assemble a series of 2D X-ray images (radiographs) into a 3D reconstruction, visualized here with a color map that corresponds to the varying densities of material in this shoe.

Unlike traditional 2D X-ray imaging, industrial CT generates a complete 3D volume, presenting a holistic view of the object. This process allows the user to observe any part of it from any angle, granting a granular inspection capability not possible with conventional methods. However, the CT scanner is only part of the equation. It is the integration of CT scanning with powerful software tools for visualization and analysis, such as Lumafield’s browser-based Voyager software and Atlas AI co-pilot, that truly unlocks its productive potential across a range of industry applications.

Where does industrial CT fit into product development?

R&D and design

  • Validate new designs: Industrial CT inspection enables engineers to validate and optimize new product designs by visualizing internal structures and identifying potential problems or areas for improvement.
  • Reliability testing: By subjecting prototypes to CT scanning, engineers can assess their structural integrity and identify potential weak points or failure mechanisms, ensuring robust and reliable designs.
  • DOE studies: Industrial CT inspection allows for detailed analysis of designs under various conditions, supporting Design of Experiments (DOE) studies to optimize product performance.
  • Validate new material performance: CT scanning enables engineers to evaluate the behavior and performance of new materials, such as composites or advanced alloys, helping to select the most suitable materials for specific applications.
  • Export STL meshes for reverse engineering: CT scans provide high-resolution 3D data that can be converted into STL meshes, facilitating reverse engineering processes for product replication, modification, or repair.

Process ramp up

  • First Article Inspection: Industrial CT inspection allows for thorough analysis of first article samples, identifying defects, voids, and dimensional variations, ensuring compliance with design specifications and industry standards.
  • Supplier qualification: CT scanning aids in assessing the quality and consistency of components or parts received from suppliers, helping to qualify reliable partners for consistent supply chain management.
  • Tooling optimization: By scanning molds, dies, or other tooling components, engineers can detect manufacturing flaws, analyze wear patterns, and optimize tool designs for improved production efficiency and quality.

Production

  • Batch sampling: Industrial CT inspection enables random or targeted sampling of production batches, verifying dimensional accuracy, detecting defects, and ensuring product consistency throughout the manufacturing process.
  • Assembly verification: CT scanning allows for non-destructive inspection of assembled components, verifying proper alignment, fitment, and structural integrity, ensuring the integrity of complex assemblies.
  • Ongoing quality assurance: By periodically scanning production samples, engineers can monitor quality metrics, identify potential process deviations, and ensure adherence to quality standards.

Field support

  • Failure analysis on returns: Industrial CT inspection assists in analyzing returned products to identify the root causes of failures, helping manufacturers understand and address issues for product improvement.
  • Warranty issues: CT scanning aids in investigating warranty claims by providing detailed internal analysis of faulty components or assemblies, supporting resolution and improvement efforts.

Neptune, Voyager, and Atlas

Industrial X-ray CT has been in use for decades, but has only ever been regarded as a specialized scientific instrument and not a frontline tool for engineers, with upfront capital expenses upwards of one million dollars and yearly operating costs as high as $250,000. Legacy systems usually require a dedicated operator and hardware system. They process and store data locally, and it can take months before engineers receive a scan back to analyze for themselves. 

Lumafield is making it a reality for every engineer to build better products with the power of industrial CT. An order of magnitude less expensive than legacy systems, Lumafield’s Neptune industrial CT scanner and Voyager analysis software are affordable and easy to use, giving engineers direct access to their valuable scan data in a matter of minutes. Neptune fits into any office environment, plugging into a normal 120 V wall outlet. 
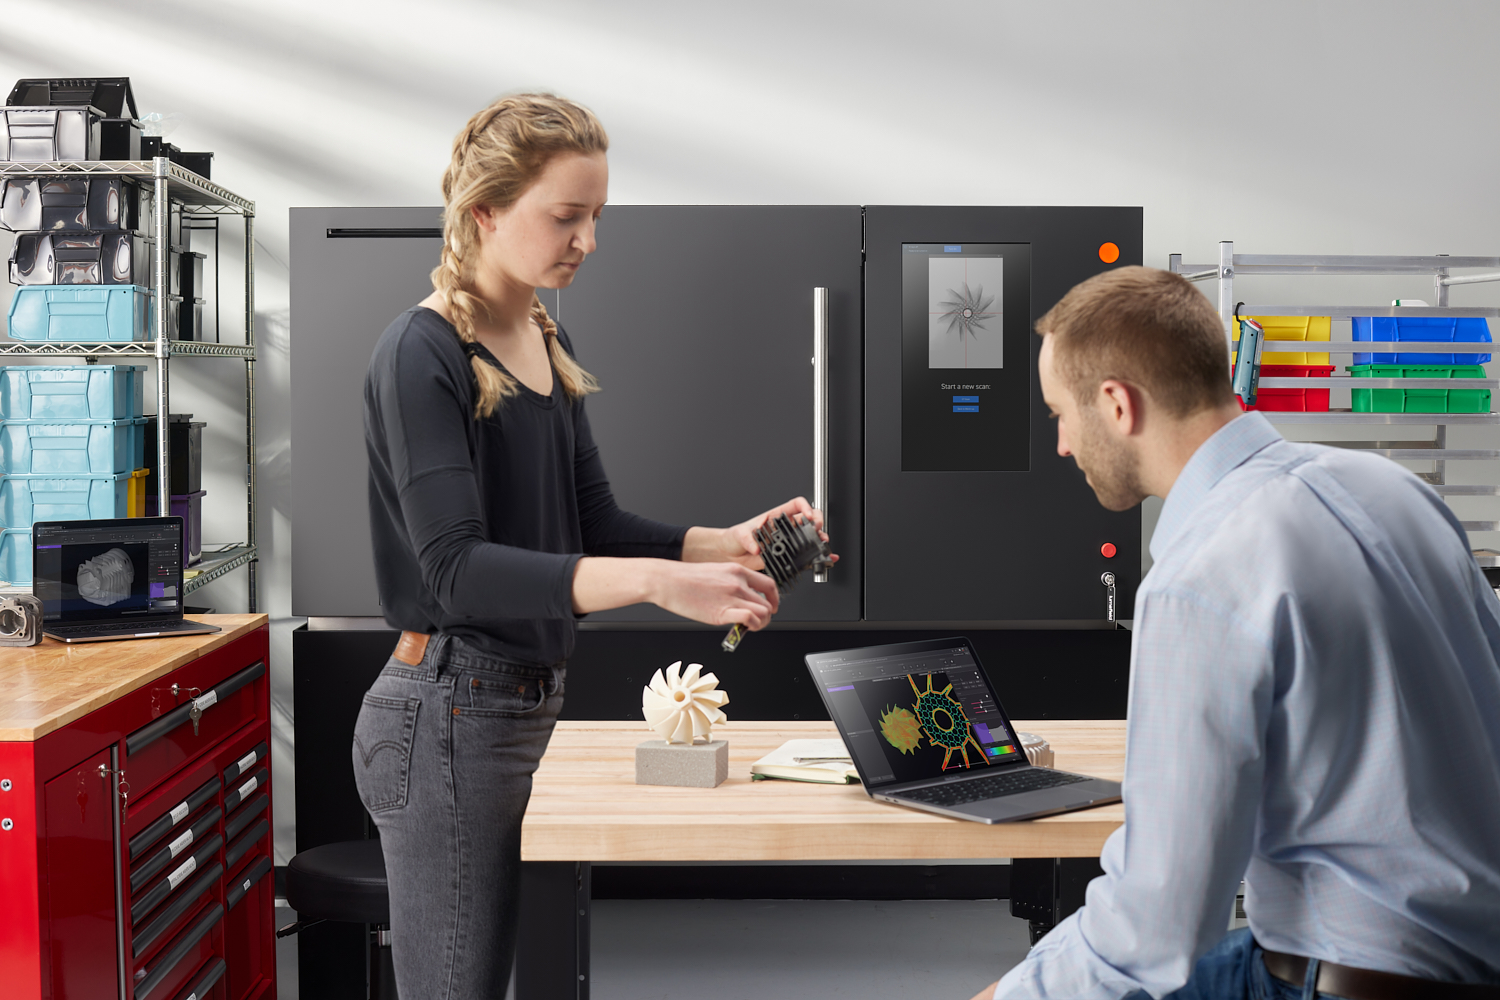
Engineers use Lumafield's Neptune industrial X-ray CT scanner and browser-based Voyager analysis software as frontline tools to collaborate in real time.

Though Neptune is an approachable tool, it can also be used at scale in production to validate supplier quality, making sure that bad parts never make it into a final product. With software that guides users through every step of the process, seeing inside a part is as simple as placing it on the turntable, closing the scanner door, and hitting the Scan button.

Neptune’s accessibility is complemented by Lumafield’s AI-driven Voyager analysis software, a cloud-based inspection platform that operates right in your web browser. Voyager gives you the power to visualize, analyze, and share your CT data directly from your computer, regardless of your location. 

Voyager helps Eaton streamline product development and production across international business units through one collaborative software platform to share, review, and edit scans in real time.

          —Kirstyn Hein, Mechanical Engineer, Eaton Group

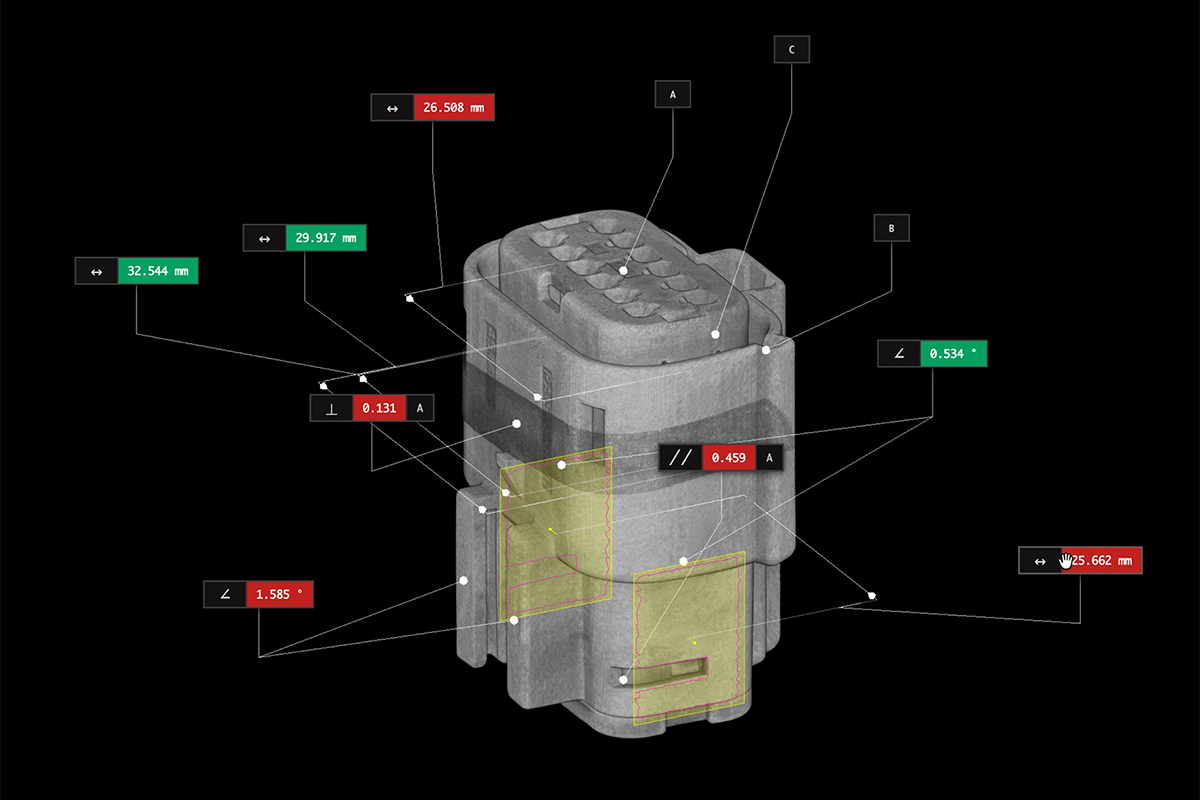
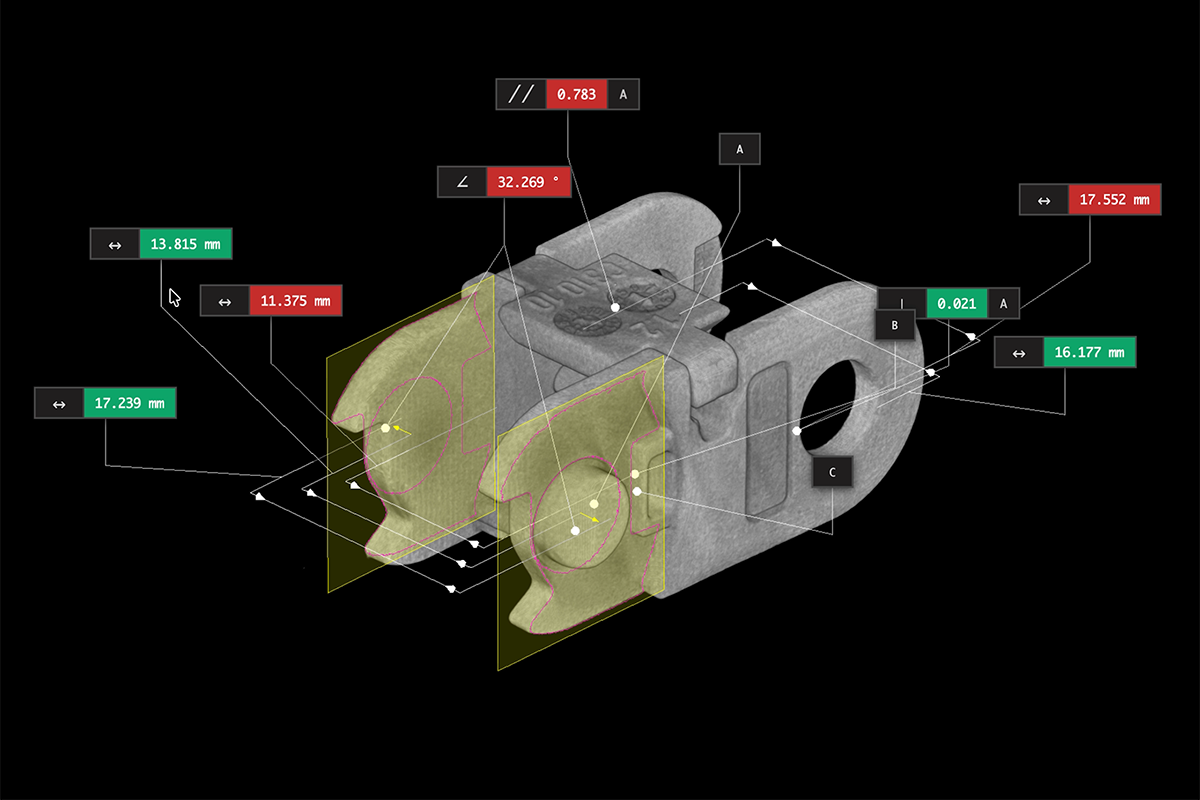
Voyager comes equipped with Atlas, the world’s most advanced AI co-pilot for engineers. With Atlas, you gain immediate access to a wealth of specialized engineering knowledge from around the world. Atlas’s ability to identify anomalies and generate annotated bookmarks that pinpoint key features condenses weeks of quality assurance processes into just a few minutes, allowing a single engineer to do what previously required an entire dedicated team.

Conclusion

Industrial CT is a powerful technology that has transformed inspection and analysis processes across industries. Its ability to provide detailed 3D insights into complex structures, coupled with its non-destructive nature, makes it an invaluable tool for engineers and manufacturers. Whether you work on consumer packaged goods, medical devices, automotive, or aerospace products, understanding the fundamentals of industrial CT can help you harness its power to improve efficiency and quality. Embracing this technology is not just a leap into the future but a strategic move to stay competitive and meet the highest standards in today's manufacturing landscape.

Resource
Article

What is industrial CT?

October 30, 2023

What is industrial CT?

Industrial X-ray CT (Computed Tomography) is transforming the landscape of product development, providing engineers with a powerful tool to unlock new insights, streamline processes, and drive innovation. Companies who insist on the highest standards of quality and efficiency are using industrial CT to accelerate decision-making and time-to-market while also saving millions of dollars on destructive testing, prototyping, and potential recalls. But what exactly is Industrial CT, and how does it empower engineers and manufacturers? 

How did CT start?

The roots of industrial Computed Tomography (CT) trace back to the pioneering work of Godfrey Hounsfield and Allan MacLeod Cormack in the realm of medical imaging, a monumental achievement that earned them the Nobel Prize in Medicine in 1979. Their work aimed to enable non-invasive imaging of the human body's internal structures. Over time, this medical breakthrough gradually found its way into industrial applications, evolving into industrial CT.

The transformation from medical CT to industrial CT marked a significant turning point for inspection at all stages of the product development process. By adapting the principles of medical CT, industrial CT has become a vital tool in manufacturing, engineering, and quality control. This evolution has enabled non-destructive inspection and analysis processes, shaping the way industries inspect components, assemblies, and materials. Industrial CT stands as a testament to the power of innovation: originally conceived to improve healthcare, it now advances a multitude of industries by providing unparalleled insights through high-resolution, non-destructive 3D imaging.

How does industrial CT work?

Industrial CT scanners take hundreds of X-ray images from different angles to capture the internal and external structure of objects in three dimensions. These scanners, including the Lumafield Neptune, work on the same basic principle as medical CT, but in a different form factor. Medical CT scanners rotate an X-ray source and a detector around a human patient. Industrial CT scanners use a turntable to rotate an object between a stationary X-ray source and detector. As X-ray beams penetrate the object, they are attenuated at varying degrees depending on the density and composition of the material they traverse. The detector records these variances, generating what are known as X-ray projections or radiographs.

In the Lumafield Neptune industrial X-ray CT scanner, an object rotates on a turntable while a stationary X-ray source takes a series of 2D radiographs of the object.

The fundamental workings of industrial CT are akin to solving a Sudoku puzzle. In Sudoku, you can deduce missing numbers by understanding that each row, column, and box must add up to a specific total. Similarly, industrial CT relies on collecting a series of 2D X-ray images, known as "radiographs," from 360 degrees around an object. Each radiograph represents an X-ray "shadow," providing information about what the X-ray encountered as it passed through the object en route to the detector. Through a process called reconstruction, these X-ray shadows are meticulously analyzed and integrated, much like solving a Sudoku puzzle.

During reconstruction, a sophisticated algorithm assembles these shadows to determine the materials' distribution within the scanned object in three-dimensional space. The result is a comprehensive 3D image in which each 3D pixel, known as a "voxel," holds a value representing the material's density at that precise location within the object. This non-destructive approach allows engineers and manufacturers to explore an object's internal and external structures with remarkable precision, without altering the physical integrity of the item.

Complex algorithms assemble a series of 2D X-ray images (radiographs) into a 3D reconstruction, visualized here with a color map that corresponds to the varying densities of material in this shoe.

Unlike traditional 2D X-ray imaging, industrial CT generates a complete 3D volume, presenting a holistic view of the object. This process allows the user to observe any part of it from any angle, granting a granular inspection capability not possible with conventional methods. However, the CT scanner is only part of the equation. It is the integration of CT scanning with powerful software tools for visualization and analysis, such as Lumafield’s browser-based Voyager software and Atlas AI co-pilot, that truly unlocks its productive potential across a range of industry applications.

Where does industrial CT fit into product development?

R&D and design

  • Validate new designs: Industrial CT inspection enables engineers to validate and optimize new product designs by visualizing internal structures and identifying potential problems or areas for improvement.
  • Reliability testing: By subjecting prototypes to CT scanning, engineers can assess their structural integrity and identify potential weak points or failure mechanisms, ensuring robust and reliable designs.
  • DOE studies: Industrial CT inspection allows for detailed analysis of designs under various conditions, supporting Design of Experiments (DOE) studies to optimize product performance.
  • Validate new material performance: CT scanning enables engineers to evaluate the behavior and performance of new materials, such as composites or advanced alloys, helping to select the most suitable materials for specific applications.
  • Export STL meshes for reverse engineering: CT scans provide high-resolution 3D data that can be converted into STL meshes, facilitating reverse engineering processes for product replication, modification, or repair.

Process ramp up

  • First Article Inspection: Industrial CT inspection allows for thorough analysis of first article samples, identifying defects, voids, and dimensional variations, ensuring compliance with design specifications and industry standards.
  • Supplier qualification: CT scanning aids in assessing the quality and consistency of components or parts received from suppliers, helping to qualify reliable partners for consistent supply chain management.
  • Tooling optimization: By scanning molds, dies, or other tooling components, engineers can detect manufacturing flaws, analyze wear patterns, and optimize tool designs for improved production efficiency and quality.

Production

  • Batch sampling: Industrial CT inspection enables random or targeted sampling of production batches, verifying dimensional accuracy, detecting defects, and ensuring product consistency throughout the manufacturing process.
  • Assembly verification: CT scanning allows for non-destructive inspection of assembled components, verifying proper alignment, fitment, and structural integrity, ensuring the integrity of complex assemblies.
  • Ongoing quality assurance: By periodically scanning production samples, engineers can monitor quality metrics, identify potential process deviations, and ensure adherence to quality standards.

Field support

  • Failure analysis on returns: Industrial CT inspection assists in analyzing returned products to identify the root causes of failures, helping manufacturers understand and address issues for product improvement.
  • Warranty issues: CT scanning aids in investigating warranty claims by providing detailed internal analysis of faulty components or assemblies, supporting resolution and improvement efforts.

Neptune, Voyager, and Atlas

Industrial X-ray CT has been in use for decades, but has only ever been regarded as a specialized scientific instrument and not a frontline tool for engineers, with upfront capital expenses upwards of one million dollars and yearly operating costs as high as $250,000. Legacy systems usually require a dedicated operator and hardware system. They process and store data locally, and it can take months before engineers receive a scan back to analyze for themselves. 

Lumafield is making it a reality for every engineer to build better products with the power of industrial CT. An order of magnitude less expensive than legacy systems, Lumafield’s Neptune industrial CT scanner and Voyager analysis software are affordable and easy to use, giving engineers direct access to their valuable scan data in a matter of minutes. Neptune fits into any office environment, plugging into a normal 120 V wall outlet. 

Engineers use Lumafield's Neptune industrial X-ray CT scanner and browser-based Voyager analysis software as frontline tools to collaborate in real time.

Though Neptune is an approachable tool, it can also be used at scale in production to validate supplier quality, making sure that bad parts never make it into a final product. With software that guides users through every step of the process, seeing inside a part is as simple as placing it on the turntable, closing the scanner door, and hitting the Scan button.

Neptune’s accessibility is complemented by Lumafield’s AI-driven Voyager analysis software, a cloud-based inspection platform that operates right in your web browser. Voyager gives you the power to visualize, analyze, and share your CT data directly from your computer, regardless of your location. 

Voyager helps Eaton streamline product development and production across international business units through one collaborative software platform to share, review, and edit scans in real time.

          —Kirstyn Hein, Mechanical Engineer, Eaton Group

Voyager comes equipped with Atlas, the world’s most advanced AI co-pilot for engineers. With Atlas, you gain immediate access to a wealth of specialized engineering knowledge from around the world. Atlas’s ability to identify anomalies and generate annotated bookmarks that pinpoint key features condenses weeks of quality assurance processes into just a few minutes, allowing a single engineer to do what previously required an entire dedicated team.

Conclusion

Industrial CT is a powerful technology that has transformed inspection and analysis processes across industries. Its ability to provide detailed 3D insights into complex structures, coupled with its non-destructive nature, makes it an invaluable tool for engineers and manufacturers. Whether you work on consumer packaged goods, medical devices, automotive, or aerospace products, understanding the fundamentals of industrial CT can help you harness its power to improve efficiency and quality. Embracing this technology is not just a leap into the future but a strategic move to stay competitive and meet the highest standards in today's manufacturing landscape.